A dimension defines the possible values of the data in your report. For example, a dimension of 'Gender' would have the values 'Male', 'Female', and 'Unknown'.
The Dimension tool is used within the configuration of other reporting tools, such as Score Charts.
To create a new dimension
Open the Dimension tool by clicking the Dimension icon from within a report, or dragging a new dimension from the Tool box into an existing report. For example:
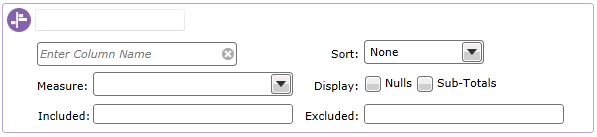
Configure the following fields:
Column name: Drag a column from the Data Explorer, or click into the field to enter or browse to the required column.
Measure: Select the measure that will apply to this column. Measures are only available to select once they have been added to the current report.
Sort: The sort field works in combination with the Measure field (described above). Where a measure is applied to a dimension, you can sort the column by the measure values in Ascending or Descending order, by selecting the required option from the drop-down menu.
Display Nulls: Nulls are disabled by default. Check this box if you want them to be displayed on the chart.
Display Sub-totals: This setting does not apply to chart reports but can be used if a saved report configuration will be used with a grid.
Included Values: Select values to include in the selection, separated by a carriage return. All values are included by default. Adding a single value to this field will effectively exclude all other values.
Excluded Values: Select values to exclude from the selection, separated by a carriage return.
If you want to save the dimension as a template, right-click on it and select Save as Template from the context menu.
Continue configuring the report.